Add booking
1. CREATE BOOKING F.I.T TOUR
To create a Booking, you need to move to the TaCRM Module to do this CREATION, if you have a role (authorized as Sales/ Marketing) then after login, your screen will be TaCRM
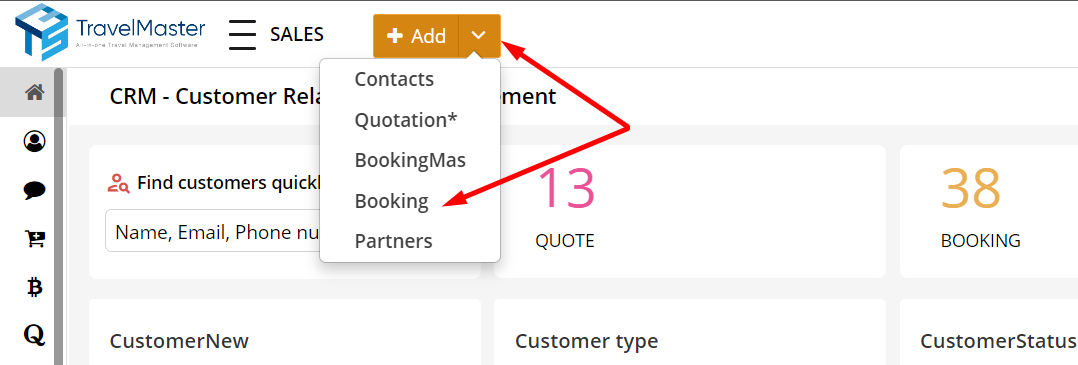
Step 1: Click ![]() on the screen > Booking
on the screen > Booking
Step 2: Enter the data required by the booking form
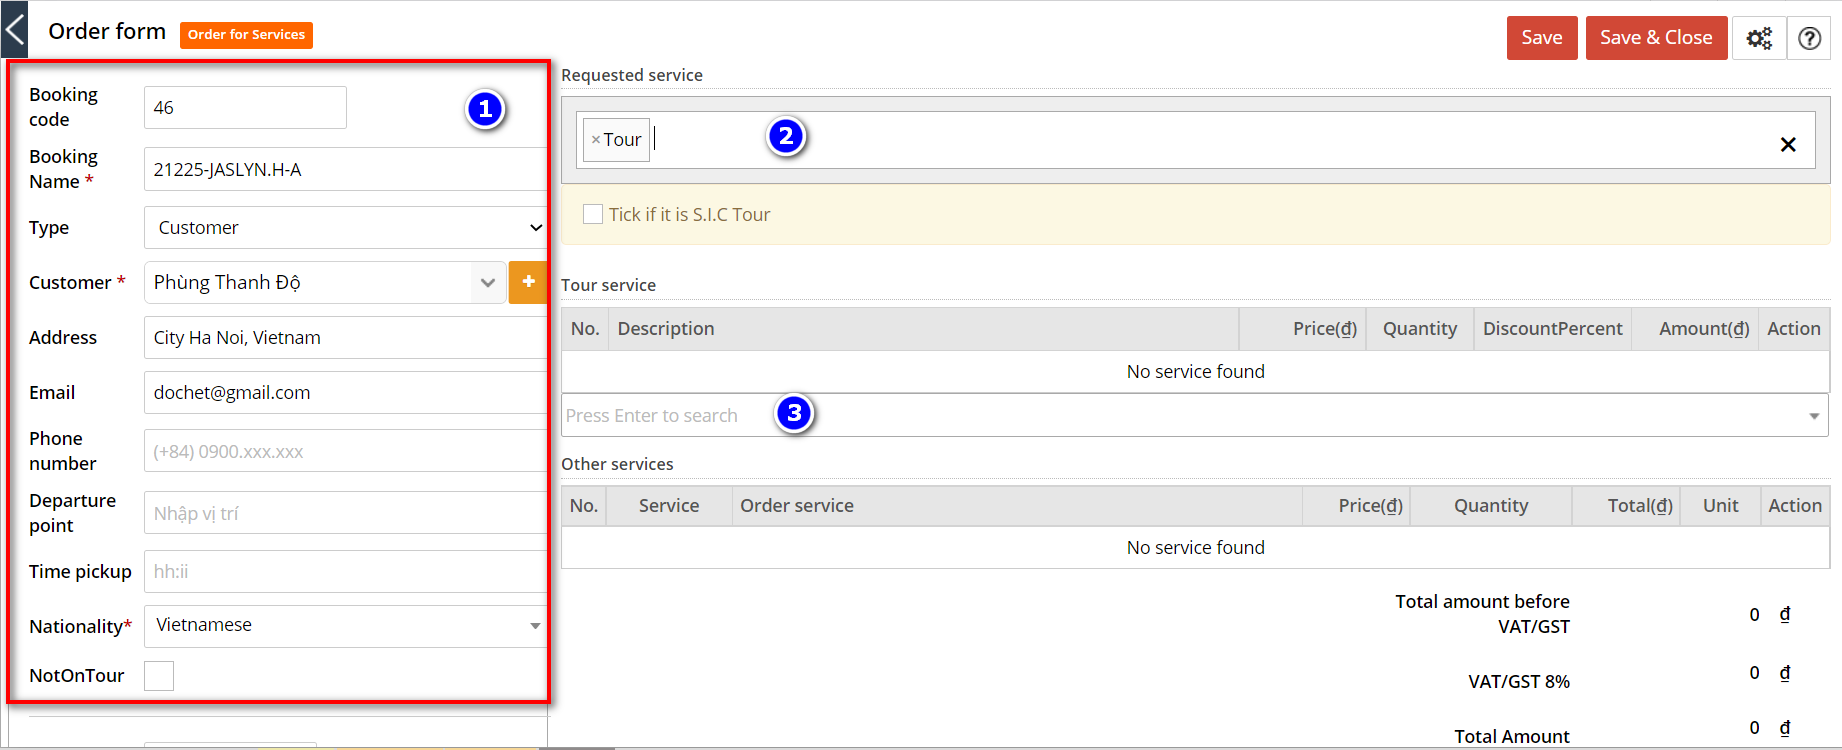
(1) Data requests must not be ignored
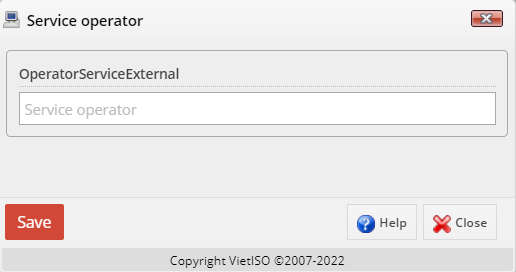
Note: If a new customer does not exist in the system, you need to quickly add a customer ![]() enter as required popup image
enter as required popup image
+ Customer code: You can't edit, number automatically counts
+ Customer name
+ Address
+ Phone number
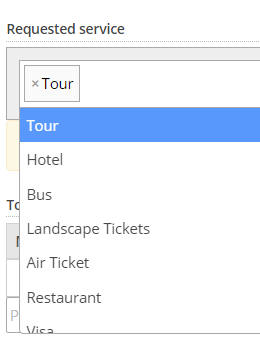
(2) Requested service: Choose Tour
(3) Click on "Press Enter to search". The system will display fully calculated tours, Open status, click![]() to select and switch to Booking details Table
to select and switch to Booking details Table
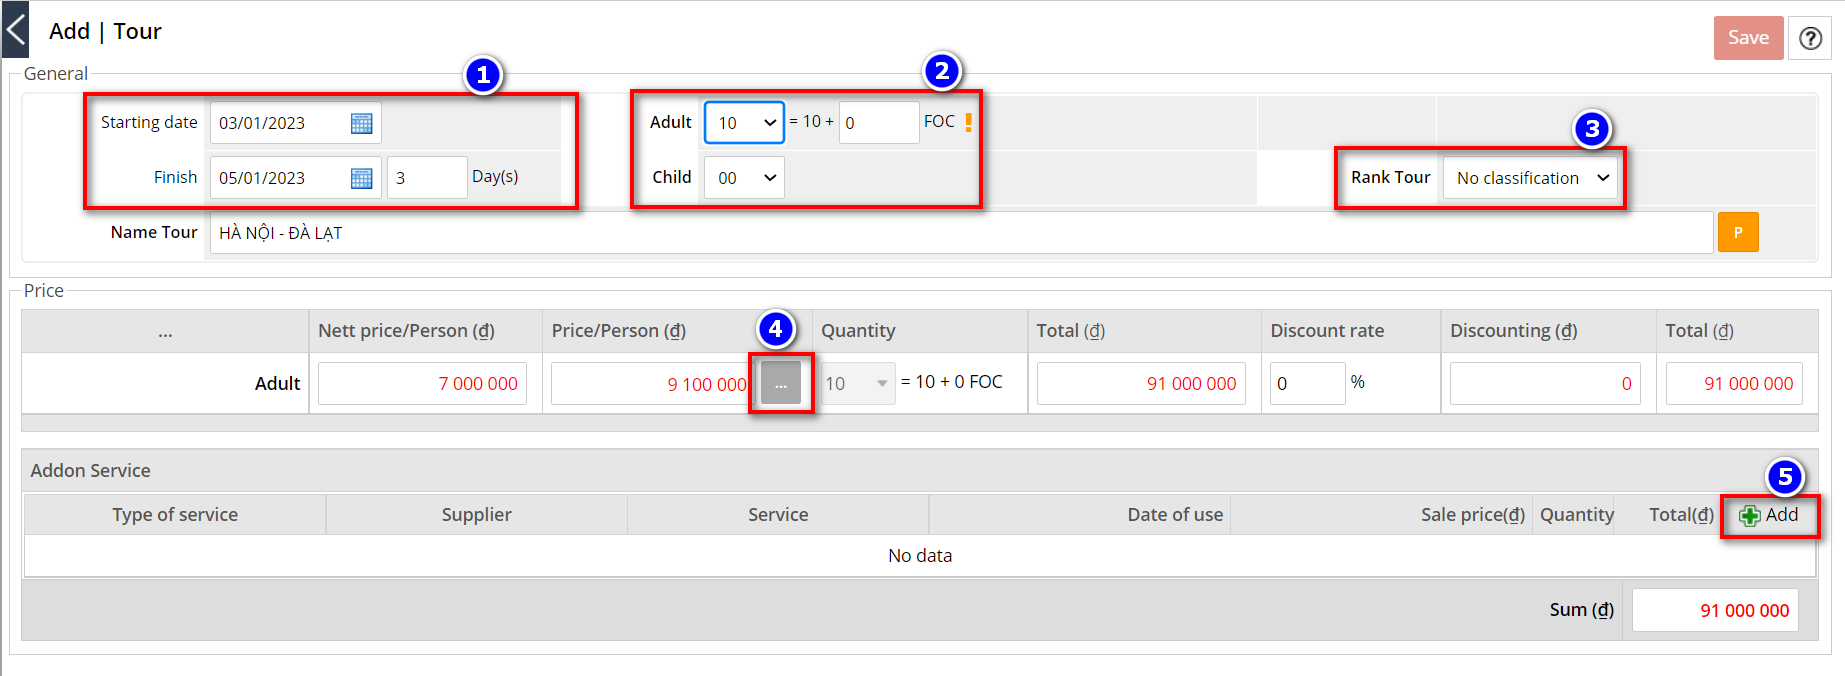
Image: Manipulating service selection in booking
Step 1: In the General Information section: Select start-end time (1), number of guests (2), tour class (3). FOC will automatically display the number of guests who are free according to the FOC policy entered at Tour Product. You can change this number of FOC.
Step 2: Click ![]() to switch to Sales Calculation table.
to switch to Sales Calculation table.
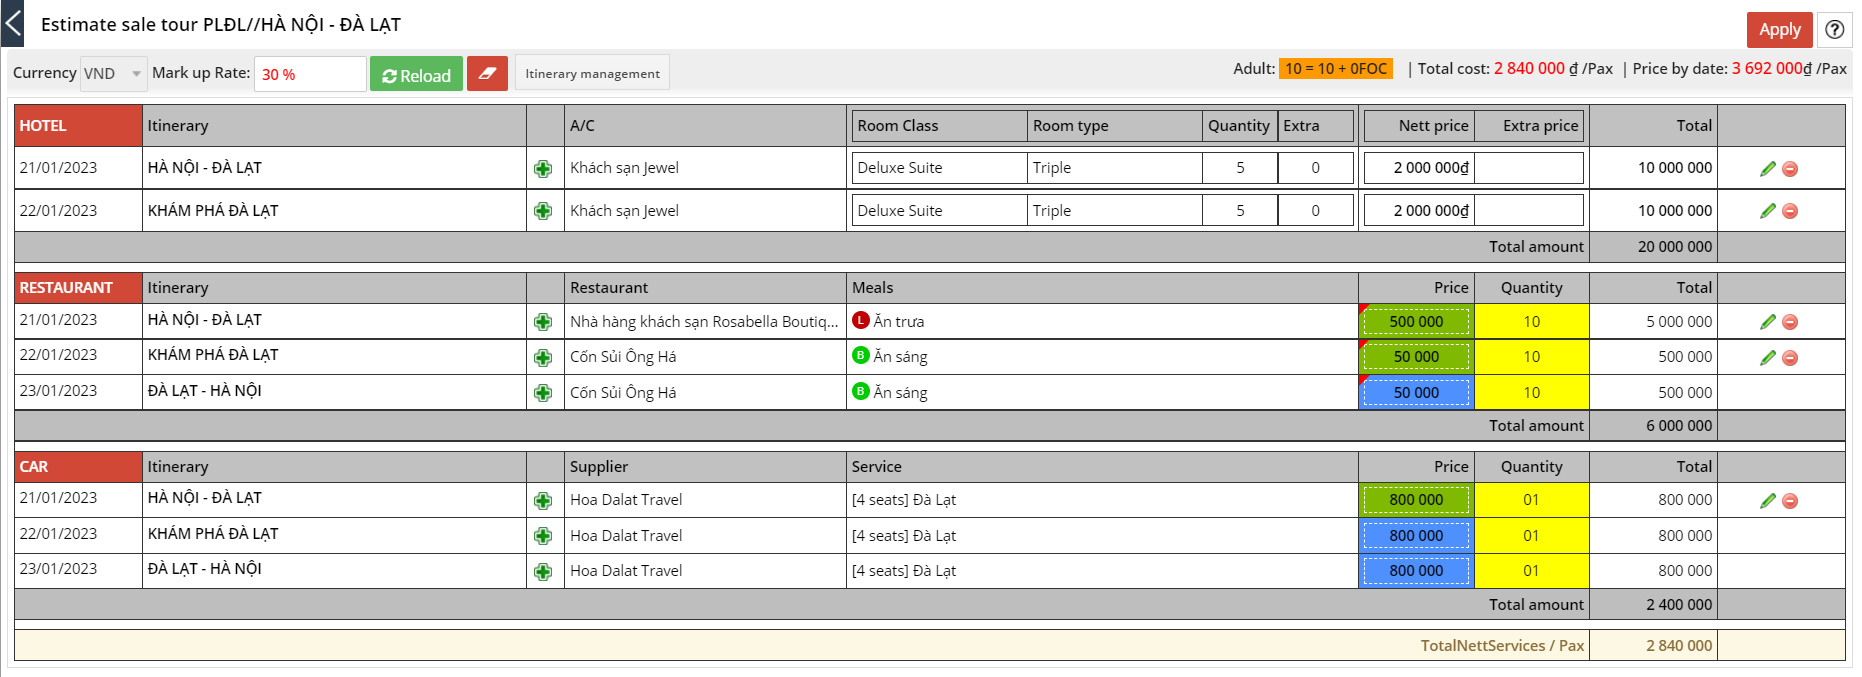
Image: Table of Sales Calculation in booking
Including:
+ Click ![]() to select the service (action like Add service in the Cost Calculation)
to select the service (action like Add service in the Cost Calculation)
+ Click ![]() at the service you want to fix and select another Supplier (or service)
at the service you want to fix and select another Supplier (or service)
+ Click ![]() at the service you want to Delete and Remove from the Worksheet
at the service you want to Delete and Remove from the Worksheet
- If there are children on the tour, you can choose the service and calculate the service for children, view here.
- In case the tour is booked on a weekend, it is necessary to change the hotel price because currently the system is defaulting to the weekday price.: Click ![]() to edit, then
to edit, then ![]()
- Click ![]() to apply the Sale Calculation table
to apply the Sale Calculation table
Note:
+ If the booking currency is the same as the system Default Currency, the exchange rate will be 1.
+ If the booking currency is different from the system default currency, change the rate in the Exchange rate box or click ![]() and click
and click ![]() for automatic exchange rate update
for automatic exchange rate update
When clicking MORE INFORMATION
+ Note: Note in booking
+ CodeAgent: Enter the agency booking code if this is a wholesale booking for your agency
- VAT/GST 10%: Select type of VAT (Price does not include VAT, Price not yet including VAT, Price includes VAT)
| Price does not include VAT | Price not yet including VAT | Price includes VAT | |
| Description | No VAT | VAT included, VAT will be added to the total booking value | VAT is included, VAT has been included in the total booking value |
| Total pre-tax money | GrandTotal | GrandTotal | GrandTotal / 1.1 |
| VAT 10% | 0 | Total pre-tax money * 10% | GrandTotal / 1.1 |
| GrandTotal | GrandTotal | Total pre-tax money + VAT 10% | GrandTotal |
| Base on VAT = 10% | |||
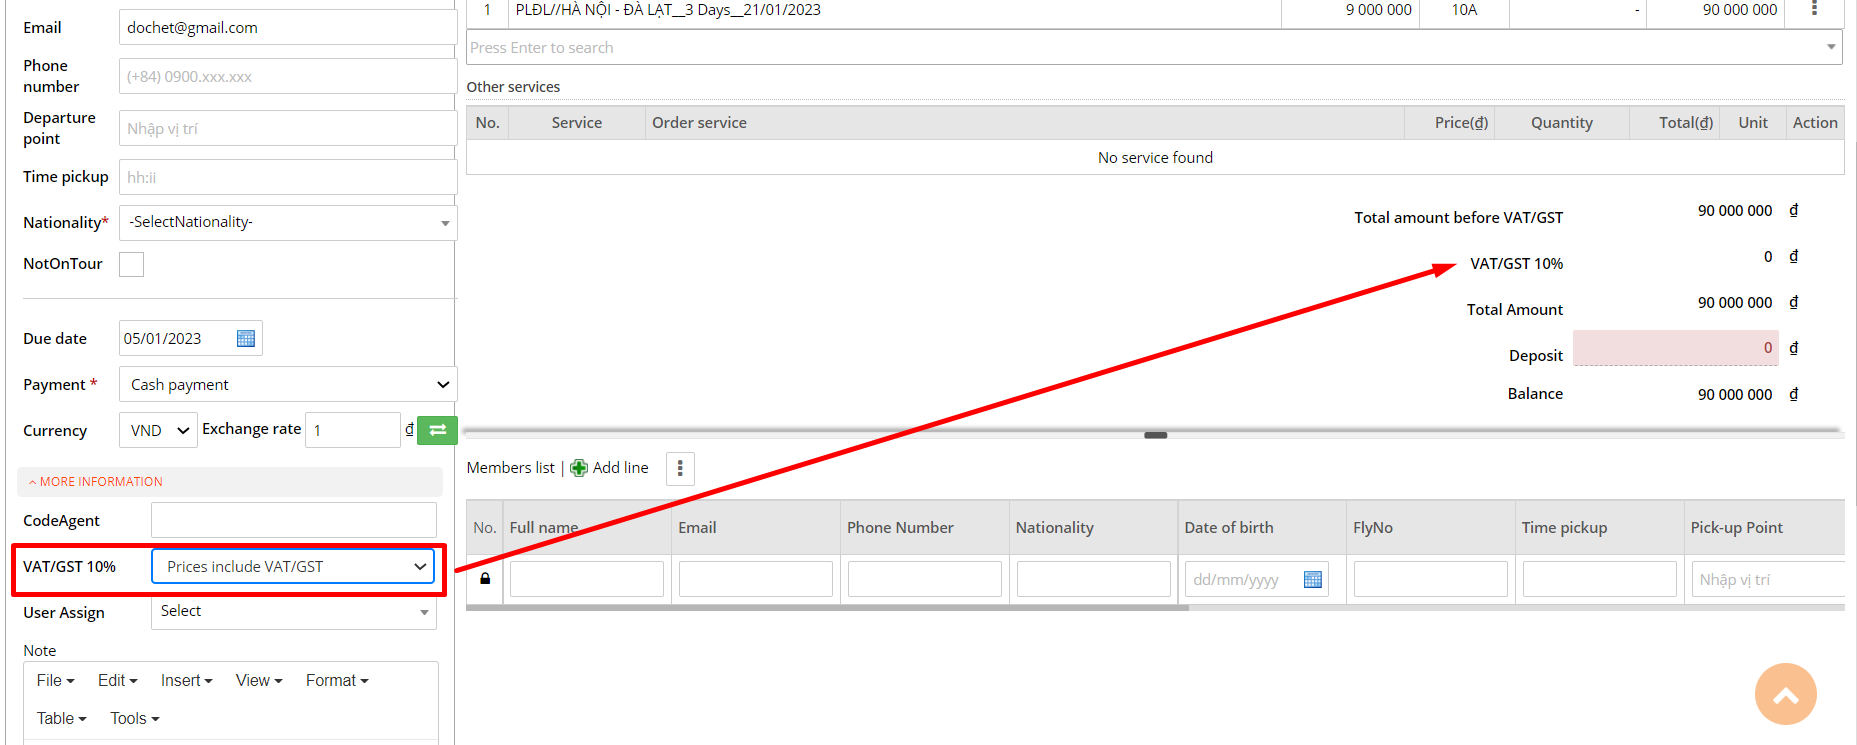
Image: Select VAT Type and apply on the total booking value
Step 3: Add other services, extra services in the tour (This step can be skipped)
+ Click ![]() then select the type of service Addon service you want to add to the booking
then select the type of service Addon service you want to add to the booking
+ There are 2 ways to add Addon service for tour booking
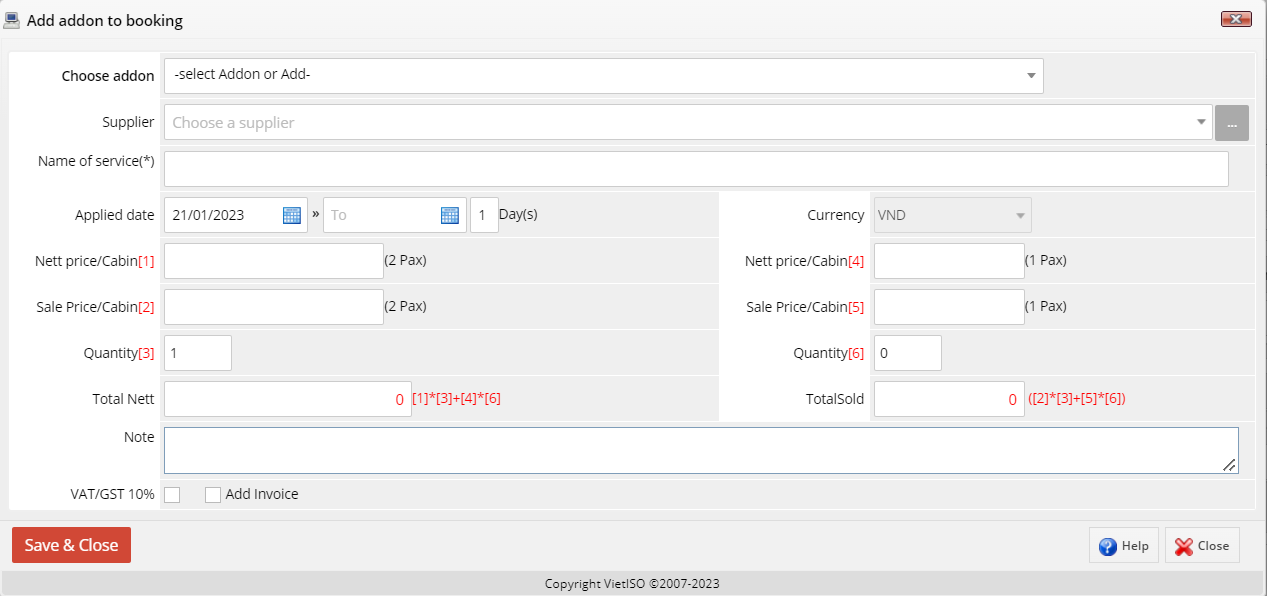
Image: Add new addon service to tour booking
(1) Method 1: Select the configured Addon service in the Addon service area, view here
When choosing a preconfigured Addon name, the system will automatically fill in Supplier, Service Name, Nett Price, Selling Price. However, you will not be able to edit Nett price, service price, if you want to fix it, you need to go back to the management area of Addon Service
You choose the quantity to use, the system will calculate the total price
Then click ![]() to finish
to finish
(2) Method 2: Add a new Addon service (do not select an existing addon service)
In the Supplier field, click on the name of the Supplier and the name of the service used, the system will display Nett price and Service selling price
Change the service price (if any) and choose the number of services to use
Sau đó nhấn ![]() để hoàn tất thêm mới Addon service cho booking tour
để hoàn tất thêm mới Addon service cho booking tour
Step 4: Save the Popup table with the information just entered
- How to calculate the booking price when there is FOC: When there is FOC, the selling price of 1 guest will change, the total booking value remains unchanged. The system will then take the total booking value divided by the number of guests after deducting FOC to calculate the price of 1 guestExample: Tour price for 9 guests is 18,000,000 VND, equivalent to 2,000,000 VND/pax
1 FOC applies, which means the price is only applicable for 8 guests, 1 guest is free. At that time, the price of 1 guest will change to: 18,000,000/8 = 2,250,000 VND/pax
- Enter the Member List and Notes: Enter the information of the members in the delegation for easy tracking and communication. Click ![]() to add people in the group.
to add people in the group.
Note: In the Email and Phone fields, when entering a few keywords, the system will check back the email and phone number in the Customer list (Menu > Customer) to give suggestions, if you choose the suggested phone number, the system will automatically fill in the remaining fields (Full name, Email, Phone, Address, Nationality, ..)
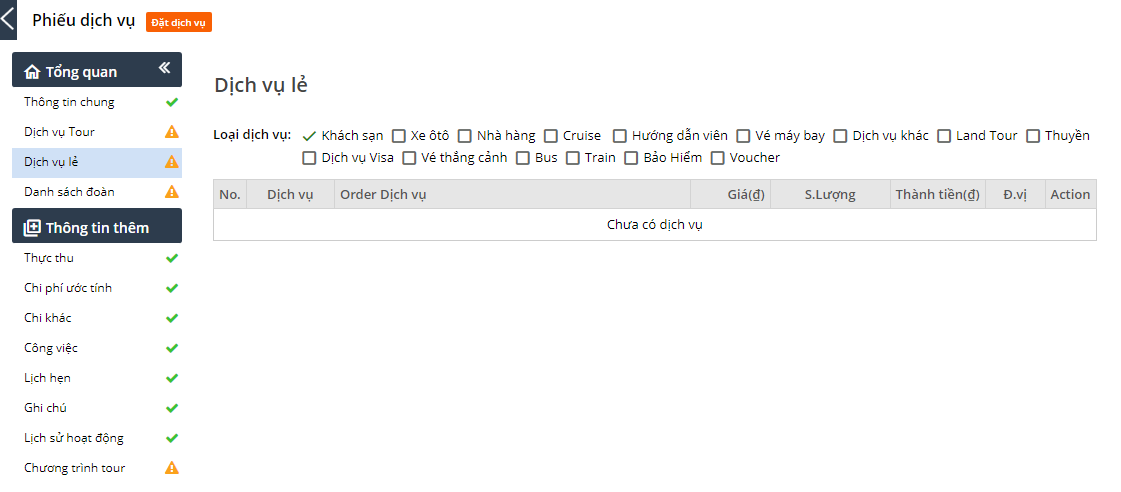
Click2. Retail Service
Step 1: Select the requested service
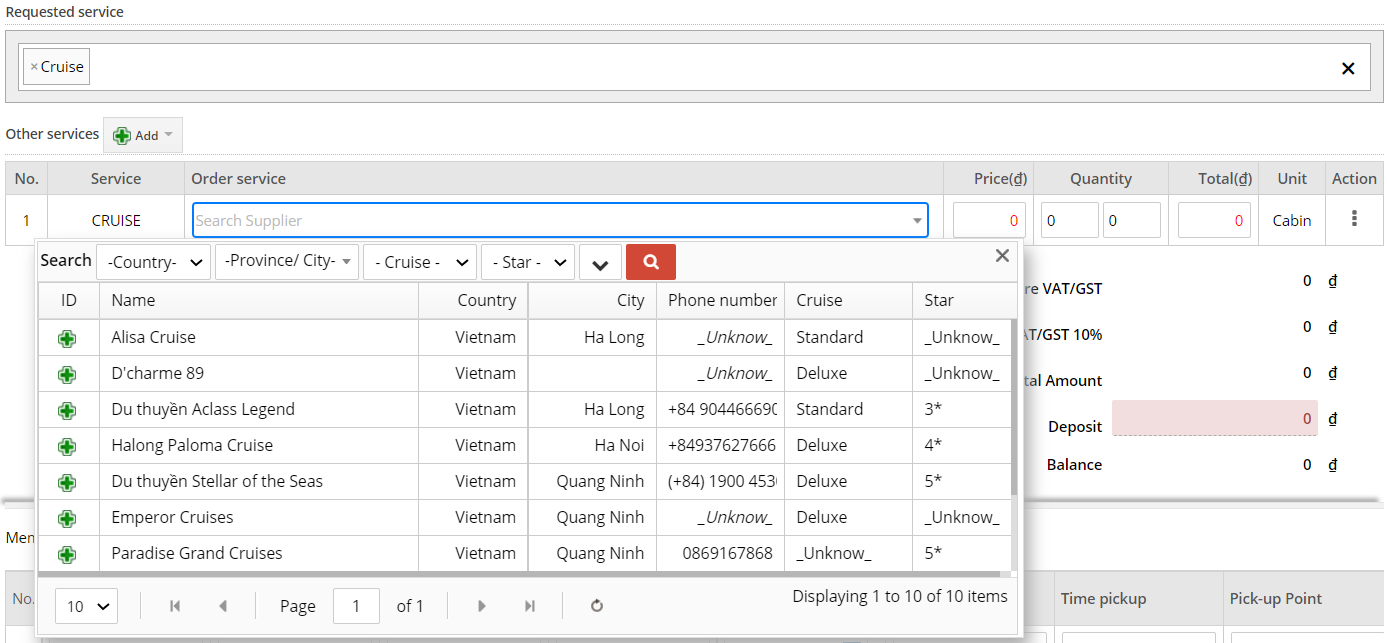
Step 2: Find and select a supplier, then select the service you want
Select service

Click

The system displays a pop-up to select the Start date, Quantity and other necessary information
Click

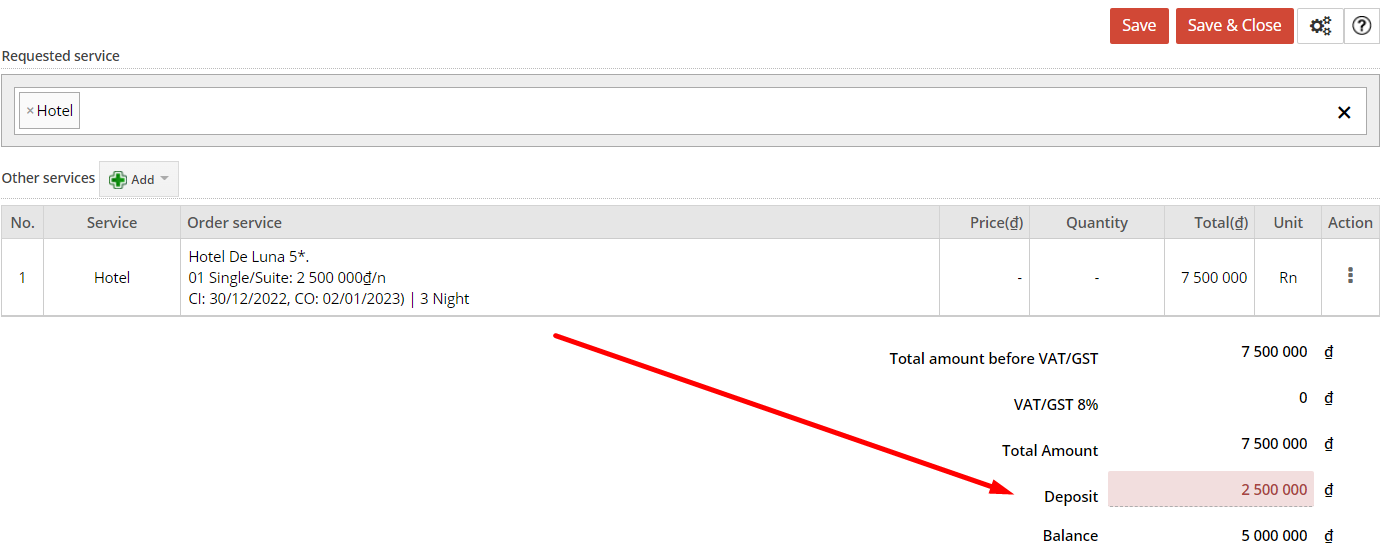
- Below is the finished screen. Fill in the advance, if any, at Deposit. Click
 to finish.
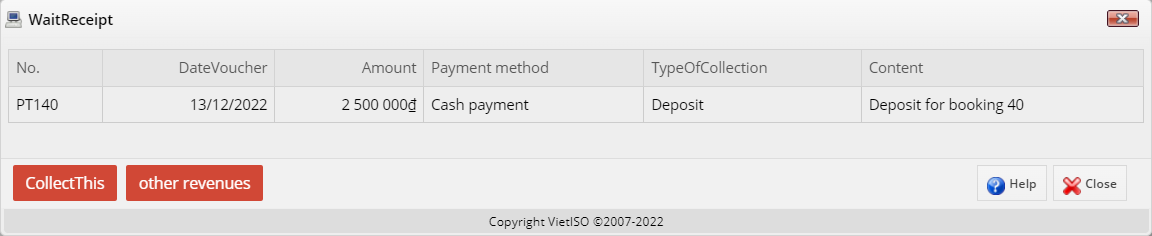
(1) After saving the booking, the system will generate a receipt (called a waiting receipt). If you click ![]() you can collect the previously created voucher or create another one (this other receipt will increase the value of the booking)
you can collect the previously created voucher or create another one (this other receipt will increase the value of the booking)
Click
 to collect the previously created Receipt.
Click
 to create another voucher (this other voucher will increase the value of the booking)
(2) When entering the advance, the system will automatically add 01 receipt at this booking, you can check and collect according to the following instructions.
- Click on the booking you just created
- Right click on the receipt > Edit
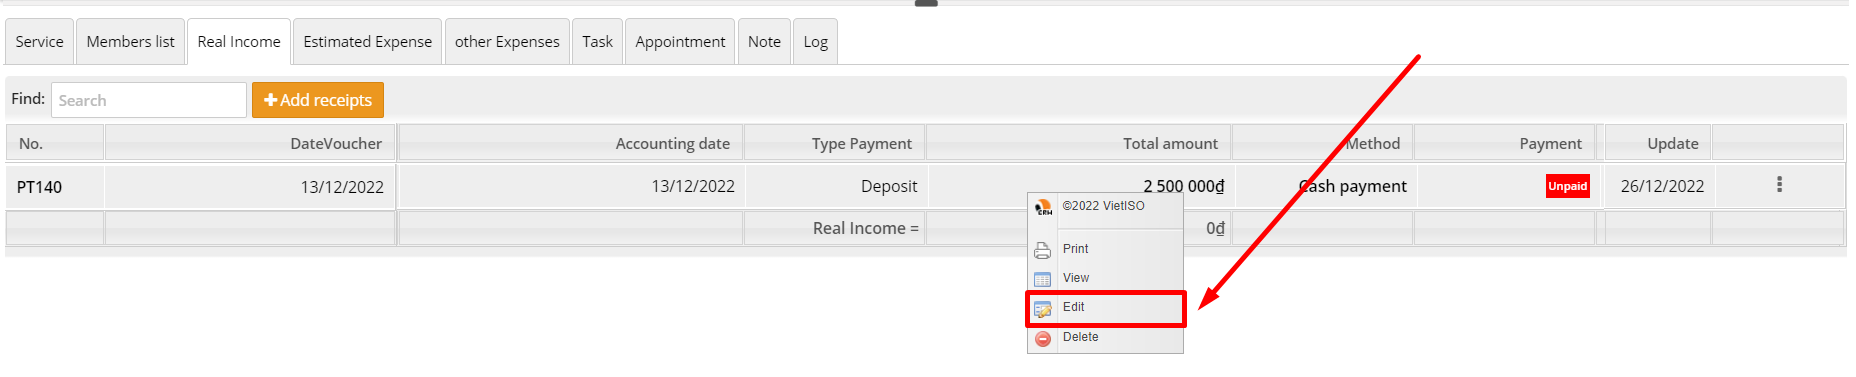
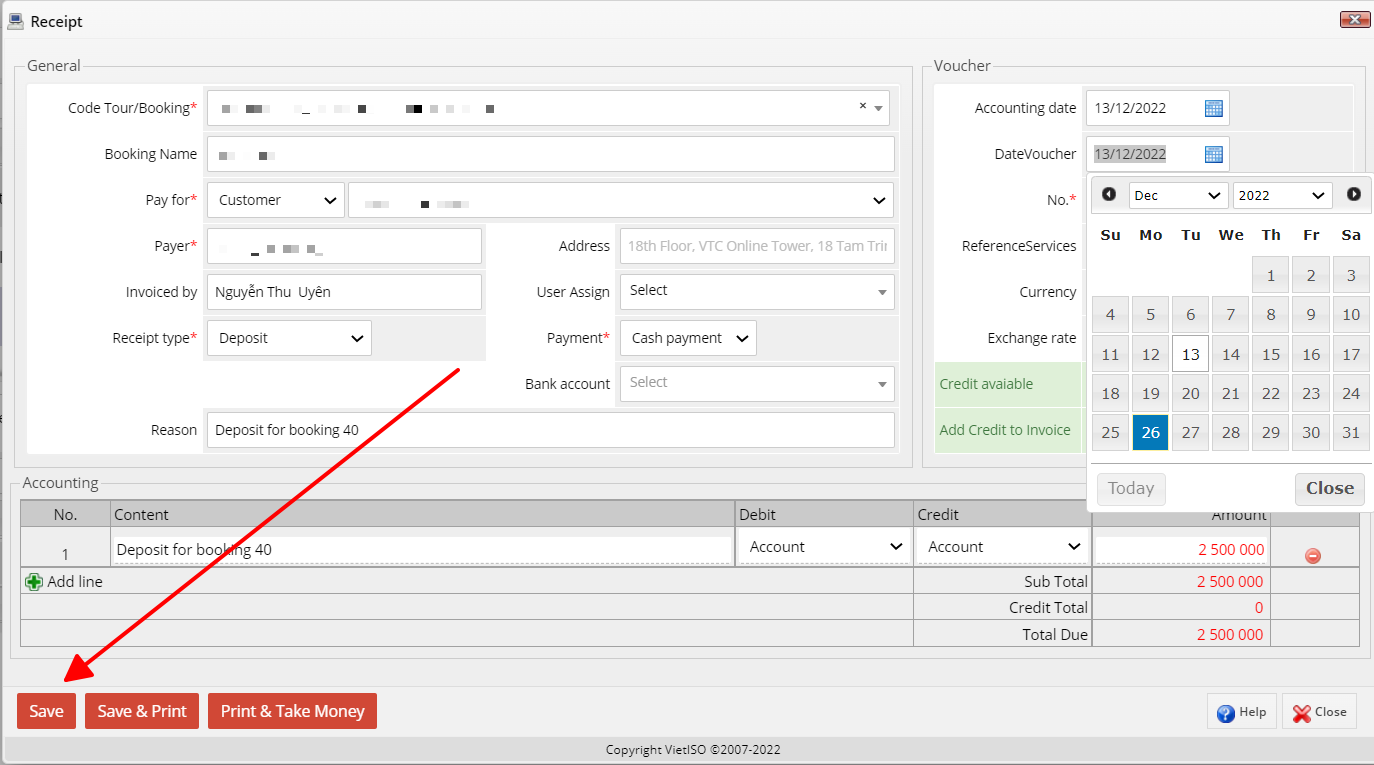
- 01 detailed receipt popup is displayed, you need to Enter the payer's name and click ![]()
3. Search Booking
Access: Menu -> Booking/Request -> Booking

Image: Search booking
Here you can search for Bookings by different criteria
- Enter keywords by booking code or booking name.
- Type of search date: The system allows to filter by 2 types:
+ Creation Date: The date the booking was created
+ Date of use: Departure date of the tour (for tour services), date of service use (for other services).
- From .... To ...: Filter period from date ... to date ....
- Status: Request, Cancel, Finish, etc...
- Sale by: Search for bookings by name of Sales staff
- Operator: Search for bookings by the name of the booking operator.
* To view the information of a Booking, we left-click on that Booking . The information sheet of that Booking will be displayed right below.
** Quickly add information of Booking by clicking on Add new or Add in the respective Tab of Booking. Then enter the content according to the required data fields and then click ![]()
** Refer to how to edit and delete information of Booking here
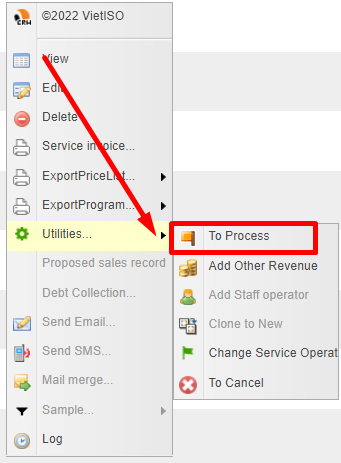
4. Functions when right-clicking on a Booking
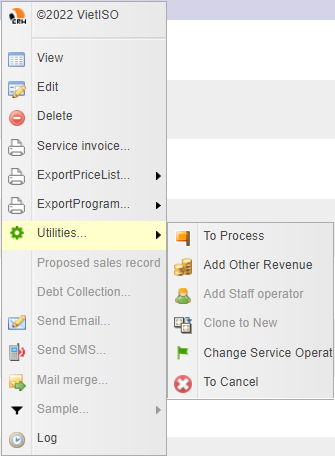
Image: Functions when right-clicking on a Booking
- View: View bookings in the form of Service Orders
- Edit: Edit information in booking (customer information, tour date, tour service, ...)
- Delete: Delete booking (A booking can only be deleted when the booking status has not changed to "Done")
- Export Price List: Download price list of booking in 3 file formats: Word, Excel, PDF. The file will display all the services used in each tour day with the detailed price of each service.
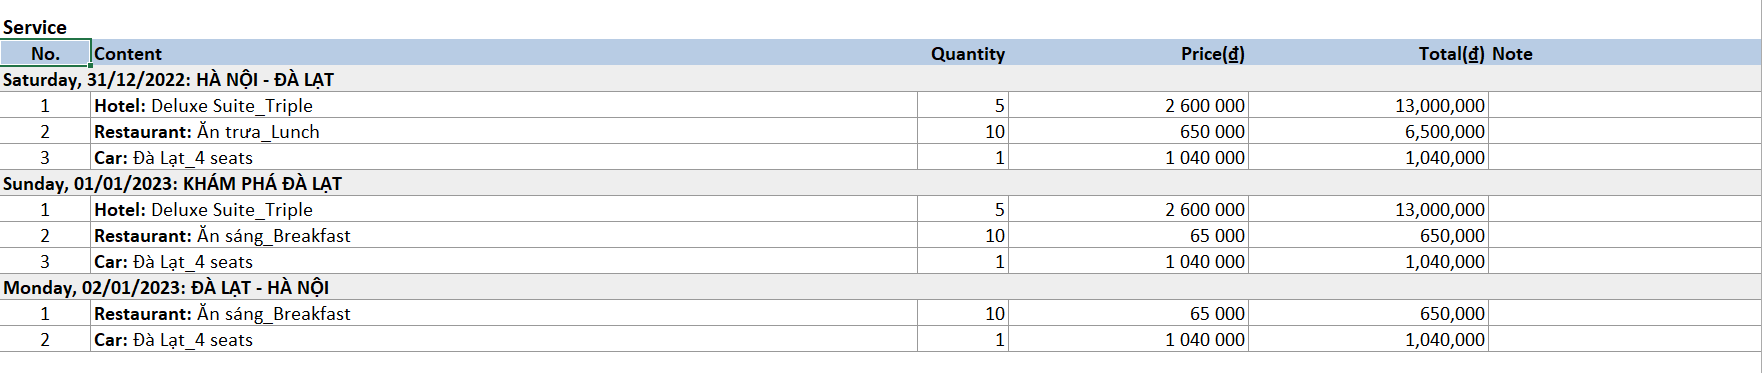
Image: Download excel file of price list
- Export Program: Download the tour program in 2 file formats: Word, PDF.
- Service Invoice: Download Service Request Form in PDF file or Print Service Request Form
- Utilities:
+ To Process: Transfer to the Operations department for the Operator to perform the steps to book services with the Supplier. Detail here
+ Add Other Revenue: Adding new charges, services/receivables after adding new ones will affect the booking value. After clicking "Add other revenue", the system will display a service receipt, follow the instructions below:
(1) In the "Add" section, select the service you want to add a new one. Add the necessary services in turn
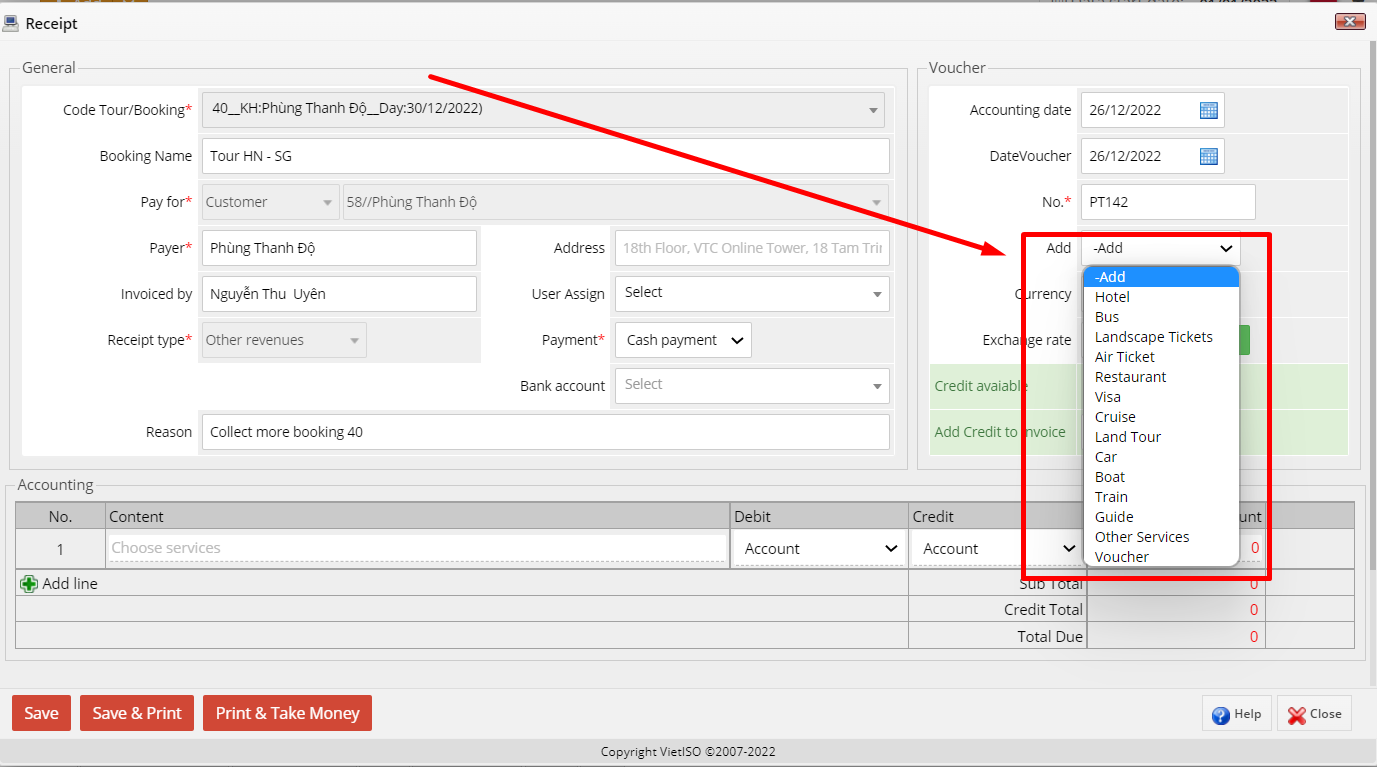
Image: Choose additional services in the tour
(2) Select Supplier, edit the price (if any), then tick ![]() (if the service has not been paid, do not tick this box). Click
(if the service has not been paid, do not tick this box). Click ![]() to finish.
to finish.
(3) Back to tab Operation (Menu > Operation > Service Operation > Tab Operation) to confirm service
+ Add Operator: Add the person responsible for operating the booking, add an operator for the booking. This action can only be done when the booking has been transferred (transfer to operation).
+ Clone to New: When you click this button, the system will default to CANCEL the current booking (original booking) and switch to a new booking with customer information and tour service information still remaining according to the original booking.
+ Change Service Operation: Change the service already in the tour. This action can only be done when the booking has been transferred (transferred to the tour operation). If the booking is still in the state of Booking, you need to right-click on the booking and click Edit to edit the services in the tour.
+ Cancel: Cancel an ongoing booking. (Note: Transfer bookings made (operator transfer) past the departure date cannot be canceled. The system will notify you that "The service in this booking has been performed. Cancellation failed".
- Log: List all operations related to that booking
Note: Items not in bold: Sales Request, Debt Collection, Send Email, Send SMS, Merge Mail, Templates, .. VietISO is under construction so there is no complete function.
5. Status on Booking
Each booking in the list will display a status for the Sales staff to know what status the booking is in, including 7 main statuses: Request, Order for Service, Operated, On tour, Finish, Cancel, Finalized
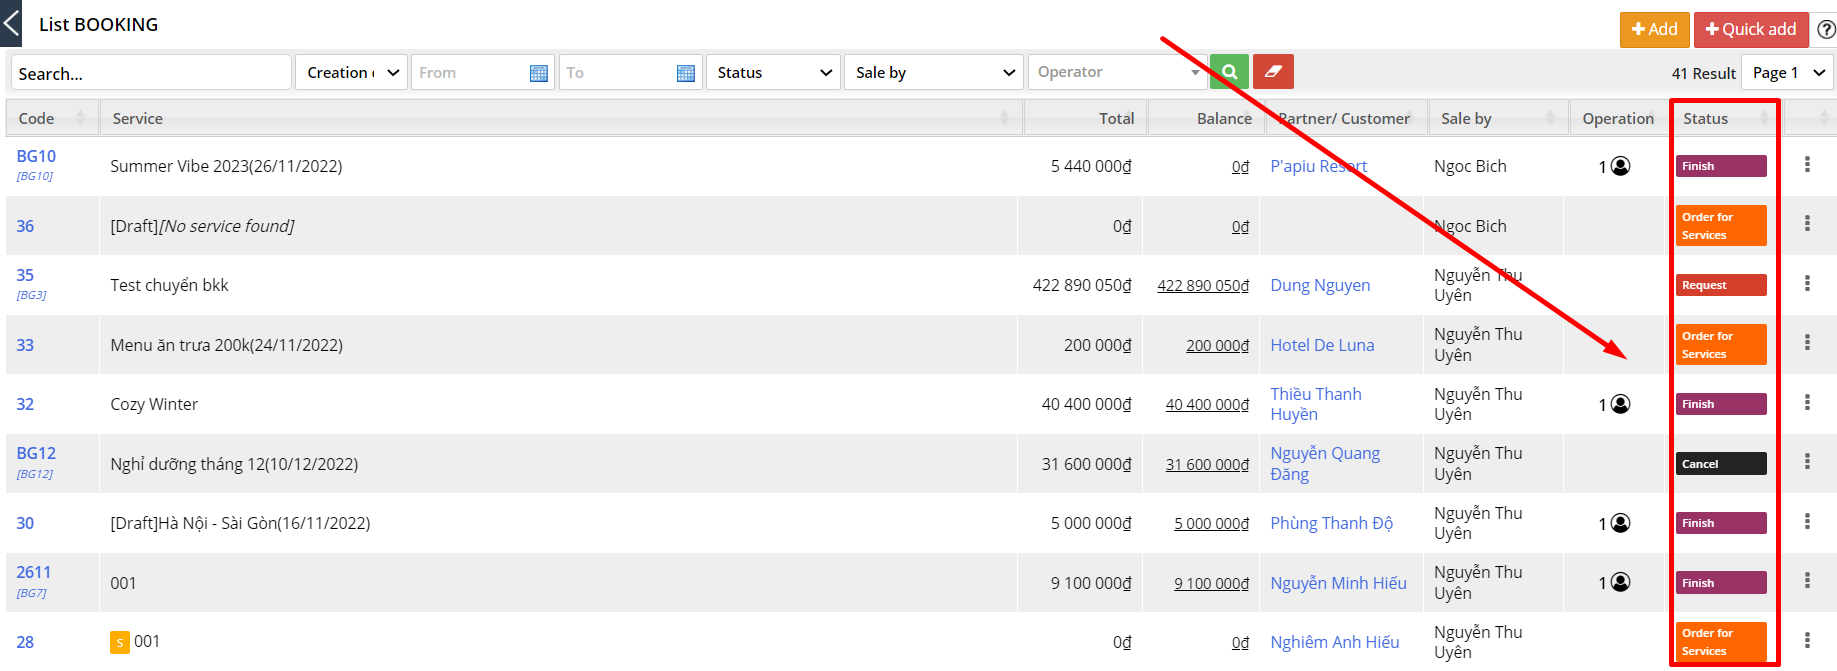
Image: Status on booking
(1) Request: Status when booking is transferred from Quote. For this case, it is necessary to press "To Confirm", and then transfer to Operations.
Access: Right-click on Booking > Utilities > To Confirm
(2) Order for Service: The status of the booking has just been created and can be edited according to customer needs. Either the state after clicking "To Confirm" from state (1).
Access: Right-click on Booking > Utilities > To Process
(3) Operation: The status of the booking has been transferred to Operation and the current date has not yet reached the departure date
(4) On Tour: The status of the booking has been transferred to Operation and the current date is the date in that tour itinerary.
(5) Finish: The status of the booking has been transferred to Operation and current date has passed compared to the date in the tour itinerary
(6) Cancel: Booking status is Canceled due to customer not using anymore or some other reason.
Note: To Cancel a booking, the departure date of the booking must be the current or future date
(7) Finalized: Is the state in which the booking has been transferred to Operation. The tour is completed and the operator changes the tour status to Finalization
Access: Right-click on Booking > Finalized > Confirm
6. Information tabs at each booking
When clicking on each booking, there will be information tabs displayed so that the sale can know the status of this booking
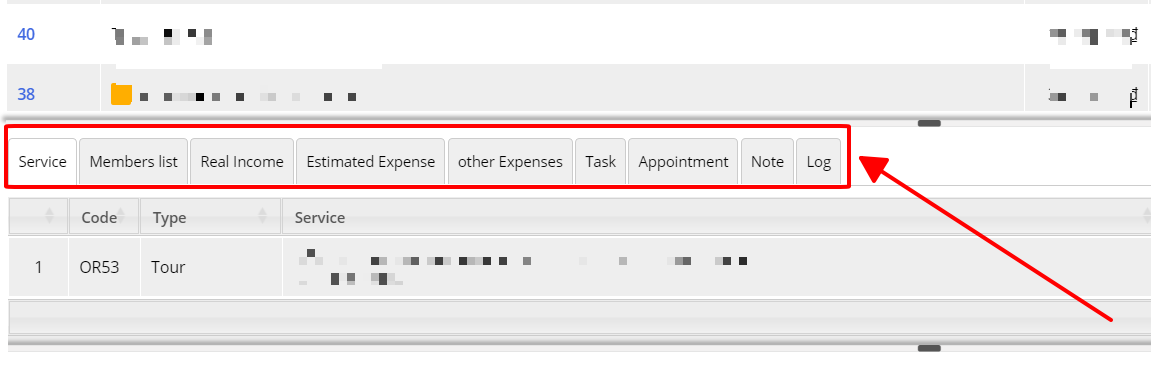
Image: Information tabs at each booking
Details and functions of the Information Tab:
a. Tab Service
Display a list of services used in the booking (including 2 types: Tour services and Non-tour services) with the total booking value and the number of guests in that booking.
b. Tab Member List: Display the list of customers going on tour. You can add 01 new customer to the Member List in the following ways:
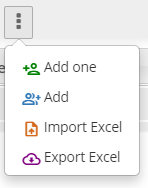
Add one: Add each customer to the list. The system displays 1 row of information for you to enter.
Add: Add more customers to the list. The system displays multiple rows of information for you to enter.
Import Excel: Use the Excel file to import the Member List into the system.
Export Excel: Export the Member List Excel file.
** Note:
+ The number of lines (rows) generated in the table will correspond to the number of guests in the booking. For example, when booking with 5 guests, 5 lines will be generated.
+ If you want to delete a certain customer's information, right-click on that row and select Remove row.
c. Tab Real Income:
- Add Receipt: Add new receipts, external receipts related to the booking being operated. Click ![]() then fill in the required information in the form.
then fill in the required information in the form.
Note: If the main receipt of the booking has not been paid (not ticked ![]() yet) then the system will display the message of Waiting Receipt as shown below:
yet) then the system will display the message of Waiting Receipt as shown below:

Click
to collect the previously created Receipt.Click
to create another voucher (this other voucher will increase the value of the booking)
d. Tab Estimated Expense
Displays expected payments to suppliers. Click ![]() to add services to the booking.
to add services to the booking.
e. Tab Other Expenses
- Display expenses related to booking.
- Click ![]() to add discount vouchers for customers. Fill in the required information and click
to add discount vouchers for customers. Fill in the required information and click ![]() to finish.
to finish.
g. Tab Task
- Displays a list of assigned tasks related to that booking.
- Click ![]() to add a new job, fill in the required information and click
to add a new job, fill in the required information and click ![]() to finish.
to finish.
h. Tab Appointment
- Display Appointments related to booking.
- Click ![]() to add a new Appointment, fill in the required information and click
to add a new Appointment, fill in the required information and click ![]() to finish.
to finish.
- Display the Notes related to the booking.
- Click ![]() to add a new Note
to add a new Note
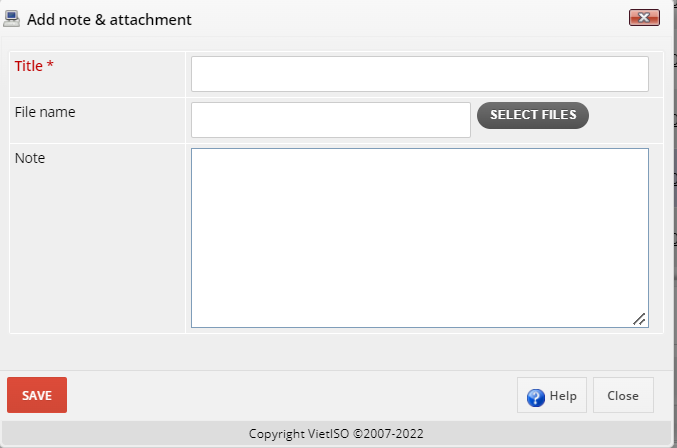
Image: Add a new Note
Including:
+ Title: Enter title of Note
+ File Name: Click SELECT FILE to select attach files
+ Note: Enter a description for the note
The above 3 fields are required fields and cannot be left blank
- Click ![]() to finish.
to finish.
j. Tab Log
- Display system operation history
7. Transfer booking to operation
Access: Right-click on booking > Utilities > To Process
- Click ![]() to finish.
to finish.
Note:
- The system will send an email to the Operator assigned to operate the tour/booking
- Actions to perform Operation, see details here
=> When the Transfer is done, move to the Service Operation step: View here
Update: 01/2023
More Information
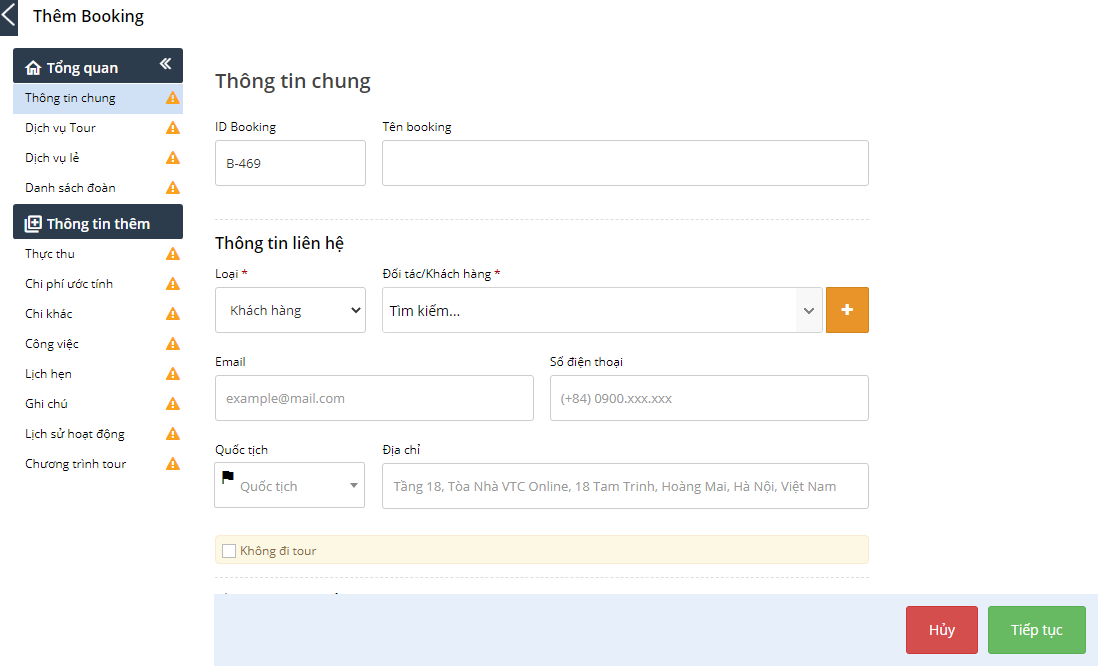
- ID Booking: Đây chính là code đoàn nếu là tour đoàn riêng và sẽ là code booking nếu là booking của tour ghép lẻ
- Tên booking
- Loại khách hàng: Bạn có thể chọn 1 trong 3 đối tượng là khách hàng trực tiếp, đại lý hoặc các Nhà cung cấp của bạn. (Tìm kiếm tên của khách hàng trong danh sách mà bạn đang quản lý. Trong trường hợp khách hàng này chưa được lưu trên hệ thống, bạn có thể nhấn vào dấu cộng màu cam và bắt đầu nhập các thông tin về khách hàng. Các trường dấu sao là bắt buộc, sau khi xong hệ thống sẽ đồng thời lưu thông tin khách hàng này vào danh sách khách hàng của bạn)
- Ô tích Không đi tour: nếu đó là booking đại lý hoặc người đại diện đặt tour không tham gia chương trình tour đó thì bạn tích vào ô này để hệ thống không chèn thông tin liên hệ vào danh sách đoàn
- Tiền tệ và tỷ giá: Bạn chỉ cần chọn loại tiền tệ áp dụng cho booking, hệ thống sẽ hiển thị tỷ giá tương ứng theo tỷ giá ngân hàng niêm yếu. Trên hệ thống TravelMaster chúng tôi kết nối sử dụng tỷ giá của 2 ngân hàng Vietcombank và Sacombank tùy theo loại tiền tệ.
Bên cạnh đó, bạn cũng có thể nhập trực tiếp tỷ giá theo quy định của doanh nghiệp mình trực tiếp tại ô Tỷ giá - User Assign: Nếu bạn tạo booking hỗ trợ cho sale khác, thì ở đây hãy chọn tên của Sale đó để doanh thu ghi nhận cho sale được chỉ định chính
- Ghi chú: Nội dung ghi chú nếu có. Nội dung này sẽ hiển thị ở Phiếu yêu cầu dịch vụ nếu bạn gửi cho khách và hiển thị với bộ phận điều hành sau khi sale chuyển booking sang điều hành
Nhấn Tiếp tục để lưu thông tin và chuyển sang tab tiếp theo
Lưu ý: Trên màn hình bạn thấy có 2 tab đó là Dịch vụ tour và dịch vụ lẻ.
- Nếu khách hàng đi tour, bạn nhấn vào tab dịch vụ tour để chọn tour từ hệ thống tour sản phẩm của doannh nghiệp
- Nêú khách hàng không đi tour mà chỉ mua các dịch vụ lẻ như phòng khách sạn, vé máy bay....thì bạn hãy chọn Tab dịch vụ lẻ
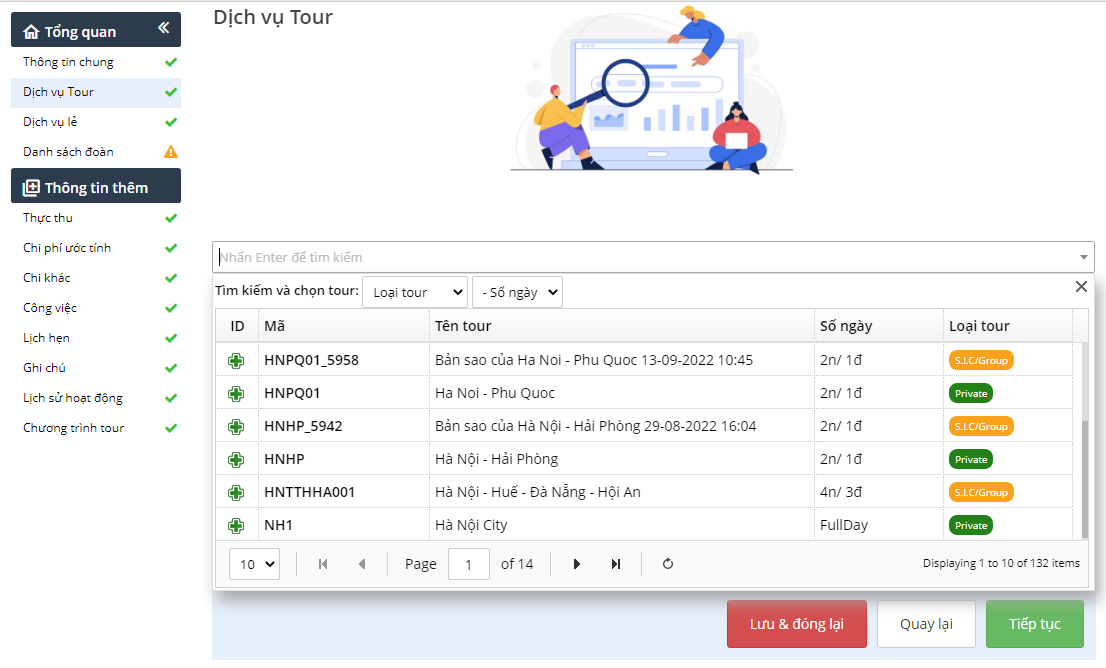
Nhấn vào ô tìm kiếm, sau đó nhập các ký tự có trong tên tour bạn muốn tìm để hệ thống hỗ trợ tìm kiếm hoặc bạn có thể tìm theo Loại tour, độ dài tour. Nhấn vào ![]() để chọn tour
để chọn tour
Tiếp theo bạn chọn ngày khởi hành, số người lớn và trẻ em
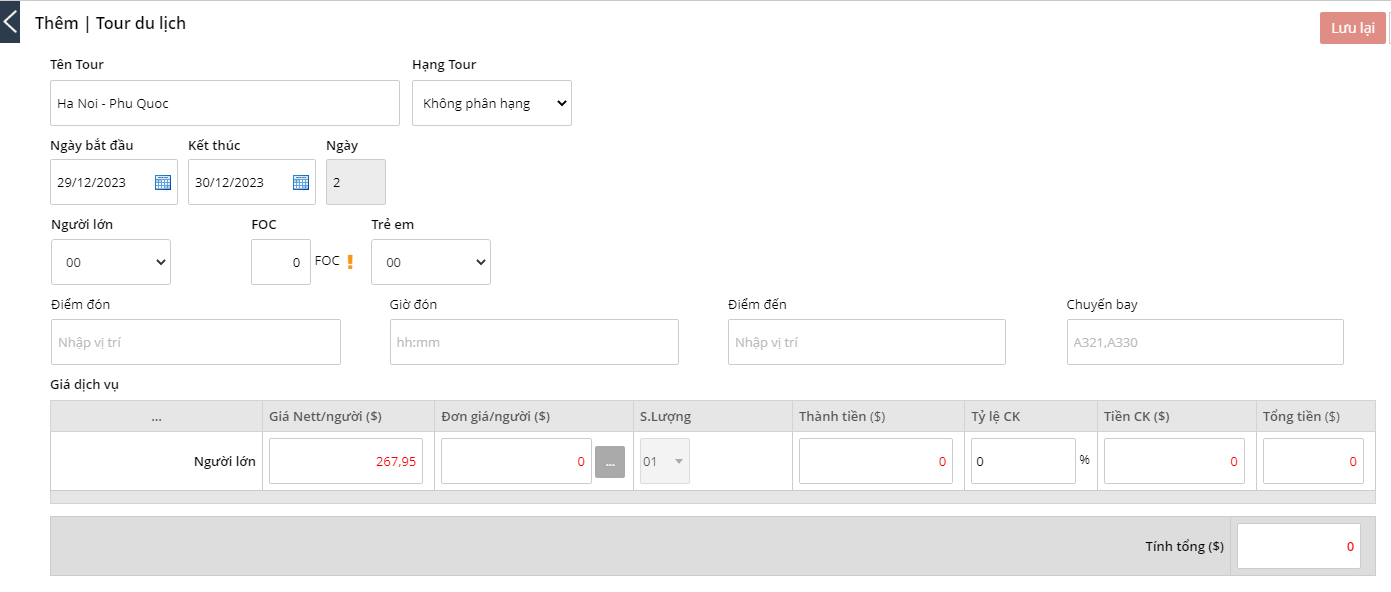
Hệ thống sẽ tự động hiển thị giá vốn và giá bán theo bảng chiết tính có của tour sản phẩm. Bạn có thể điều chỉnh giá bán bằng cách nhập trực tiếp giá vào ô Đơn giá/Người.
Nhấn vào ô vuông màu xám để kiểm tra lại các dịch vụ trong bảng dự toán giá vốn, ở đây bạn có thể nhấn vào bút xanh để thay đổi nhà cung cấp, số lượng dịch vụ theo nhu cầu nếu có. Sau đó lưu lại
Lưu ý:
- Các thay đổi về giá bán, dịch vụ trong bảng chiết tính chỉ áp dụng cho booking hiện tại, ko làm thay đổi ở tour sản phẩm của doanh nghiệp
- Nếu có giảm giá cho khách hàng, bạn có thể nhập theo % hoặc số tiền vào ô Chiết khấu
- Ô tạm ứng, bạn có thể nhập số tiền đề nghị thanh toán tạm ứng đã thống nhất với khách hàng
Tab danh sách đoàn:
Nhập thông tin đoàn theo các chức năng như thêm một, thêm nhiều người rồi lưu hoặc sử dụng Nhập Excel để import file
Tab thông tin ở Thông tin thêm:
Bạn có thể sử dụng tùy theo nhu cầu như Xem chi tiết dịch vụ sử dụng trong tour và chi phí ước tính, Note lại các công việc hay lịch hẹn có liên quan....
Update: 11/01/2024
Sau khi người Bán hàng (saler) đã chốt được các dịch vụ bán cho khách hàng. Người Bán hàng sẽ thực hiện nghiệp vụ Chuyển điều hành để thực hiện việc sắp xếp đặt dịch vụ theo tiêu chuẩn booking yêu cầu.
Quyền truy cập: Giám đốc, Kinh doanh
Bước 1: Truy cập Menu > Bán hàng > Danh sách booking
Tại cuối mỗi dòng Dịch vụ trên danh sách màn hình List Booking có nút 3 chấm, nhấn Chuyển điều hành, bạn cần chọn một Điều hành (WHO) hoặc nhiều người thực hiện điều hành cho booking của mình, sau đó nhấn Chuyển điều hành
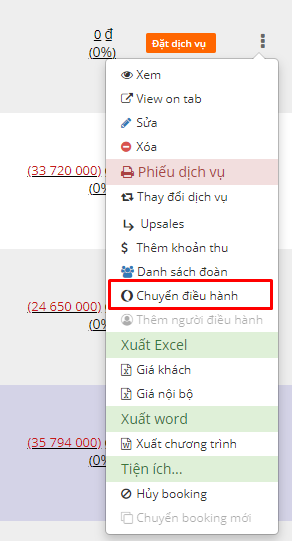
(Hình: Chức năng Chuyển điều hành trong danh sách booking)
Ghi chú:
- Bạn cần thêm điều hành, các bước thực hiện như trên và chọn Thêm điều hành tại menu xổ xuống (hình trên)
Update: 20/03/2024