Receipt - Payment
The receipts - payment vouchers are the basis for proof and explanation in the accounting and finalization of services in the BUY - SELL services of the Travel Enterprise.
Here is a guide to managing the RECEIPT - PAYMENT system in TravelMaster
A. RECEIPT VOUCHER
Menu > Report > Receipt Voucher
Receipt is a cash receipt when an accounting transaction related to cash arises. Receipt is also an invoice template that shows a completed transaction for that amount, which is an indispensable form in accounting forms.
Note when processing on the Receipt:
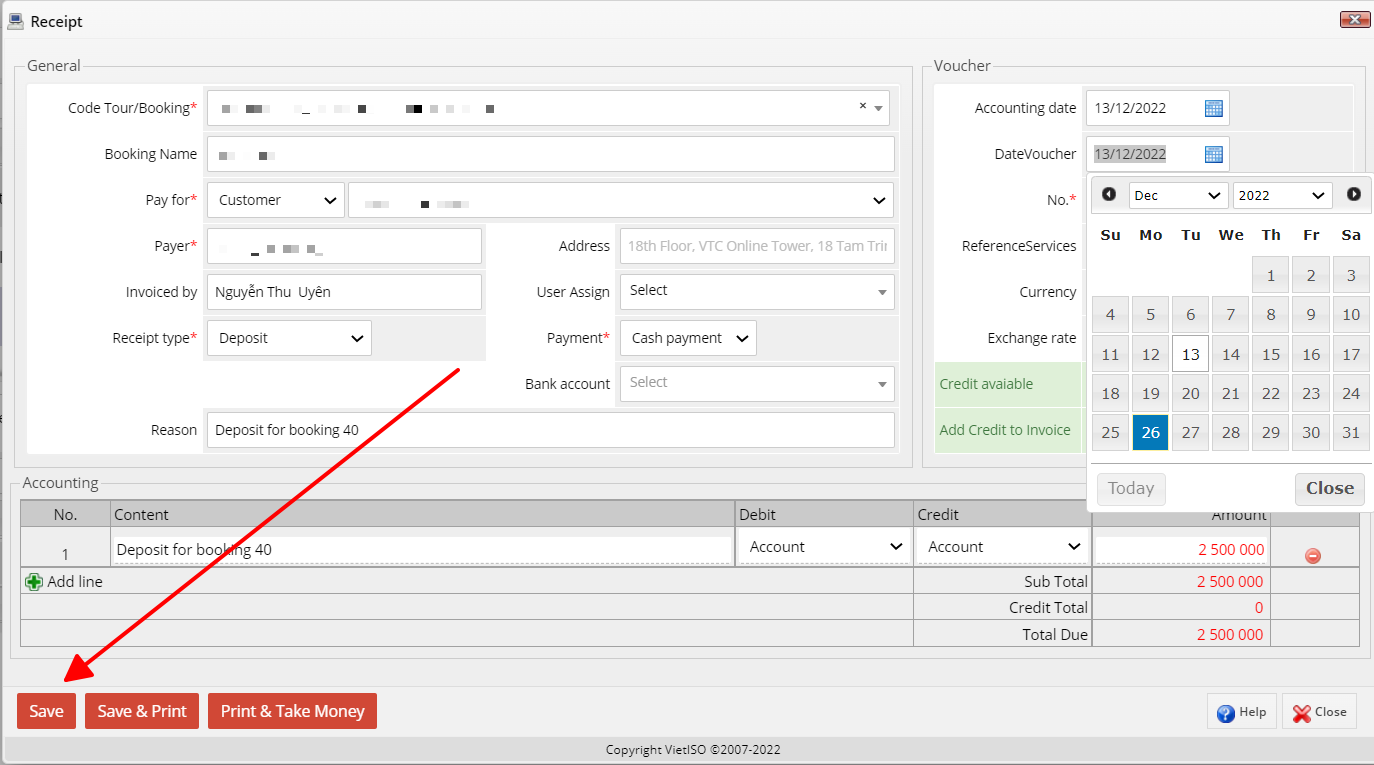
Image: Information in the receipt
Code Tour/Booking: Enter the tour code or booking code you want to create a receipt, the system automatically enters the following information into the Receipt, you need to check it before Print & Take Money.

Image: General information in the receipt
Including:
- Booking Name: Automatic
- Pay for: Automatic
- Payer: Automatic
- Invoice by: Automatic
- Receipt type: Deposit/ Paid/ Refund/ Other Revenue
- Payment: Payment method: Cash/ Bank Transfer.
- Reason: Content
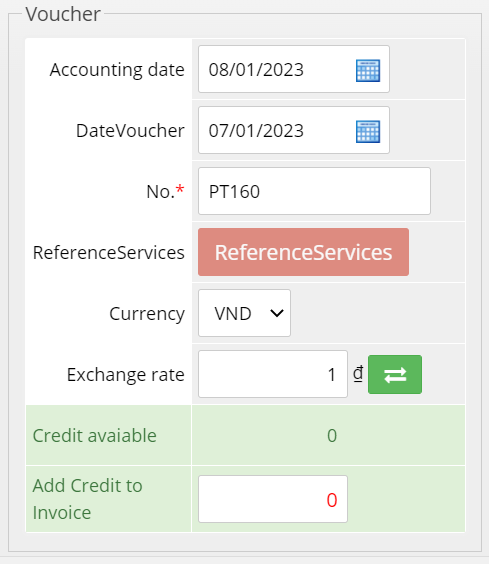
Image: Time of Voucher
Including:
- Accounting date, Accounting date
- No: The voucher number will default to the system's convention code. However, the Accountant can change to conform to the Enterprise's Convention regarding the number of vouchers.
- Reference Service: Currently, the reference service will not work because the system already displays the service in the booking as soon as you choose booking/tour to pay.
- Currency: Payment currency. If the Currency is the same as the system Default Currency, the Rate is equal to 1. If the Currency is not the same as the System Default Currency, click
 to edit or click
  for the system to automatically update the exchange rate.
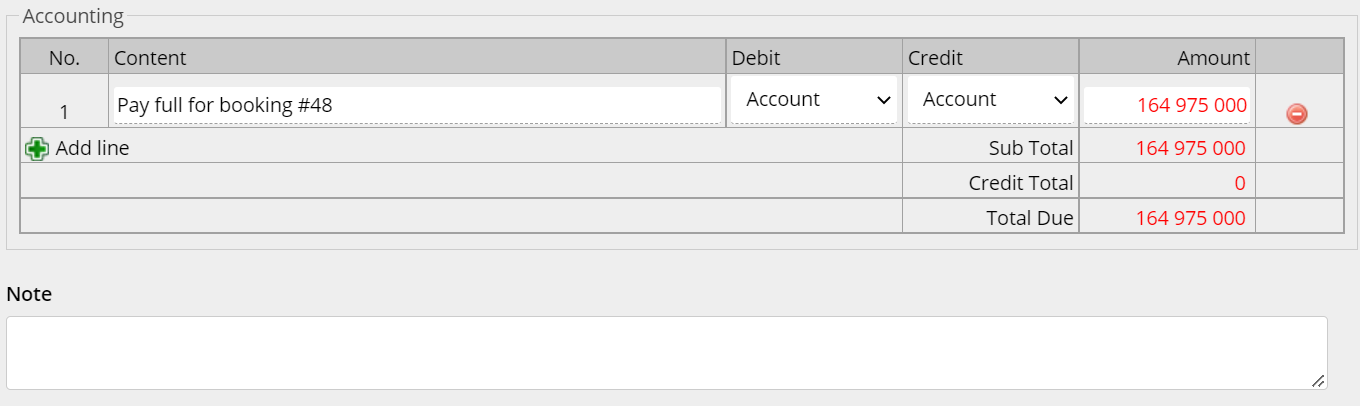
Image: Content of payment + Total value of voucher
Including:
- Accounting Content: Include content, Debit account, Credit account, amount.
- Note: For sale, operator, accountant can note information related to customers and tour use: Account information, customer information and other information
Note:
 and
and  are the function Save the receipt and does not affect the payment status of the voucher.
To pay for the receipt, click
 receipt will automatically switch to the Paid status and display the printout for the receipt.
Functions:
To add a new Receipt, you need to follow the steps below.
1. Add new Receipt:
Menu > Report > Receipt Voucher
In the upper right corner of the list of Receipts, click ![]() To add a new Receipt, fill in the information according to the instructions above.
To add a new Receipt, fill in the information according to the instructions above.
2. View Receipt:
There are 2 ways to view Receipts:
- Click ![]() at the end of each Voucher
at the end of each Voucher
- Right-click on the receipt you want to manipulate and click View
3. Edit Receipt:
Right-click the receipt > select Edit. Click ![]() to save the edited content. Click
to save the edited content. Click ![]() to print the receipt. Click
to print the receipt. Click ![]() to confirm the payment, then automatically pop up 01 receipt to print the voucher.
to confirm the payment, then automatically pop up 01 receipt to print the voucher.
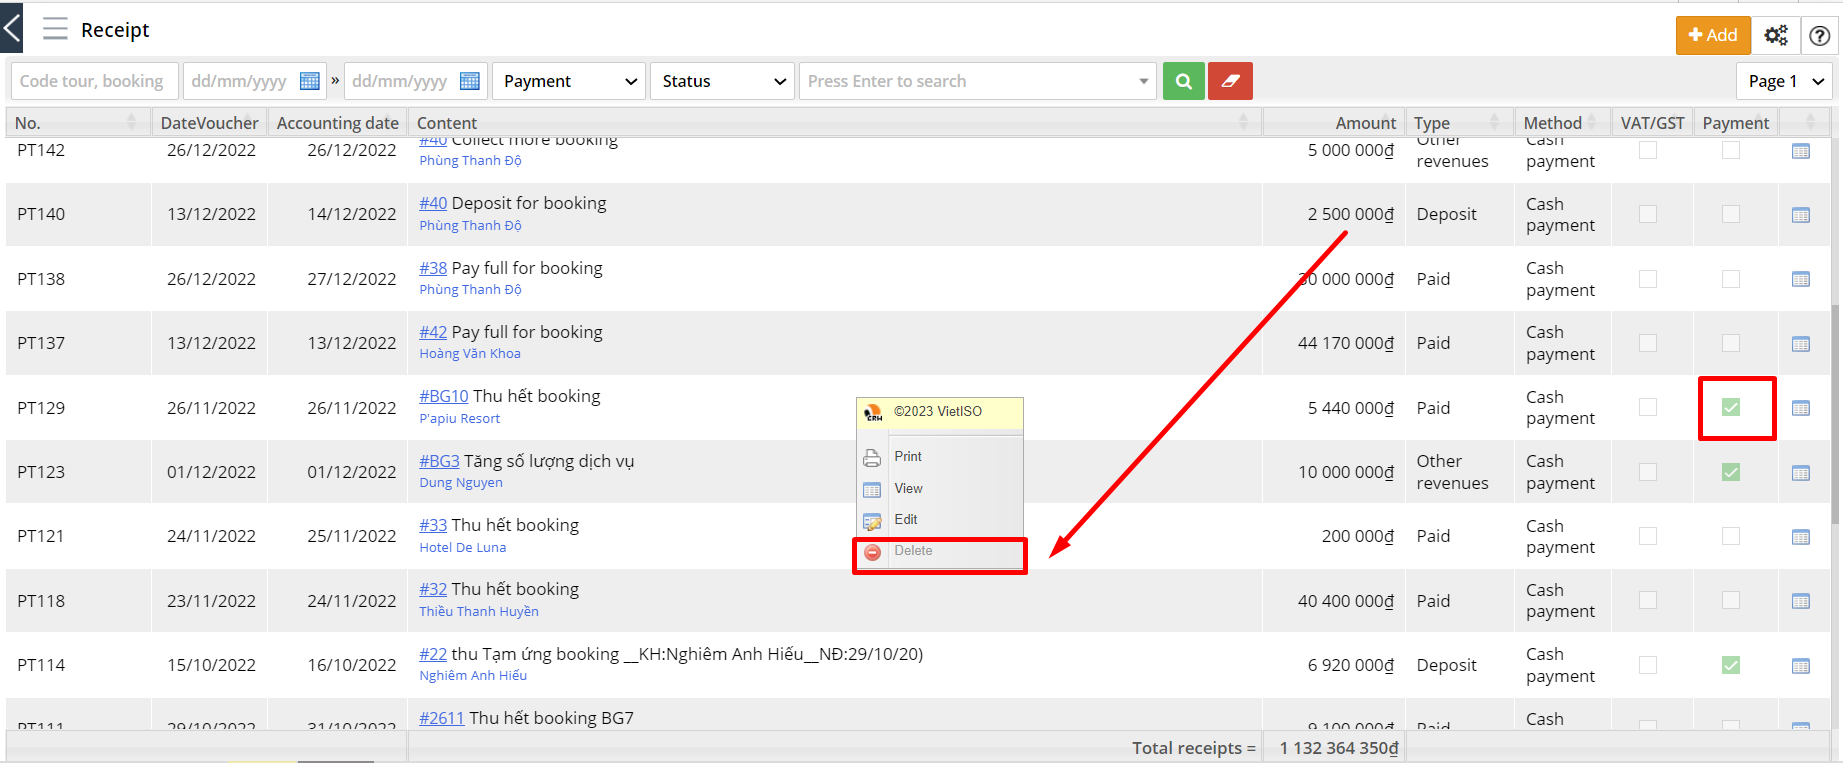
4. Delete Receipt:
To delete Receipt, we right-click on that receipt and select Delete. Confirm one more time by selecting OK to completely remove that Voucher from the system. If you do not want to delete, click CANCEL to cancel the operation.
5. Print Receipt:
To print a Receipt, right-click on the Receipt and click Print
6. Filter/Search Receipts:

In the list of Receipts, you can search for different Receipts by criteria
- Code tour, booking: Enter the code then click

- Time Period: Enter the time period then click , system will display Receipts suitable the system will display the Receipts with the Accounting Date that meets the filter interval
- Payment: Choose Payment type then click
- Status: Choose Status of receipt then click
- Customer Name: Click on the Customer name, the system will display the Receipts generated from the selected Customer
Click ![]() to clear filter conditions, the system will display all receipts in the software.
to clear filter conditions, the system will display all receipts in the software.
Advance Payment
The sales transaction usually has the ADVANCE operation, which occurs in the SALE Department, the system will automatically synchronize this RECEIPT to the ACCOUNTING module with the unpaid (uncollected) status.
The software offers an accounting module with the following:
Method 1: Operation on Service Order Form
Step 1: When creating a service order form, you need to put the amount you need to advance in the Deposit box on the SERVICE BOOKING FORM.

Step 2: Left-click on the Real Income tab, then right-click on the payment of Advance Voucher
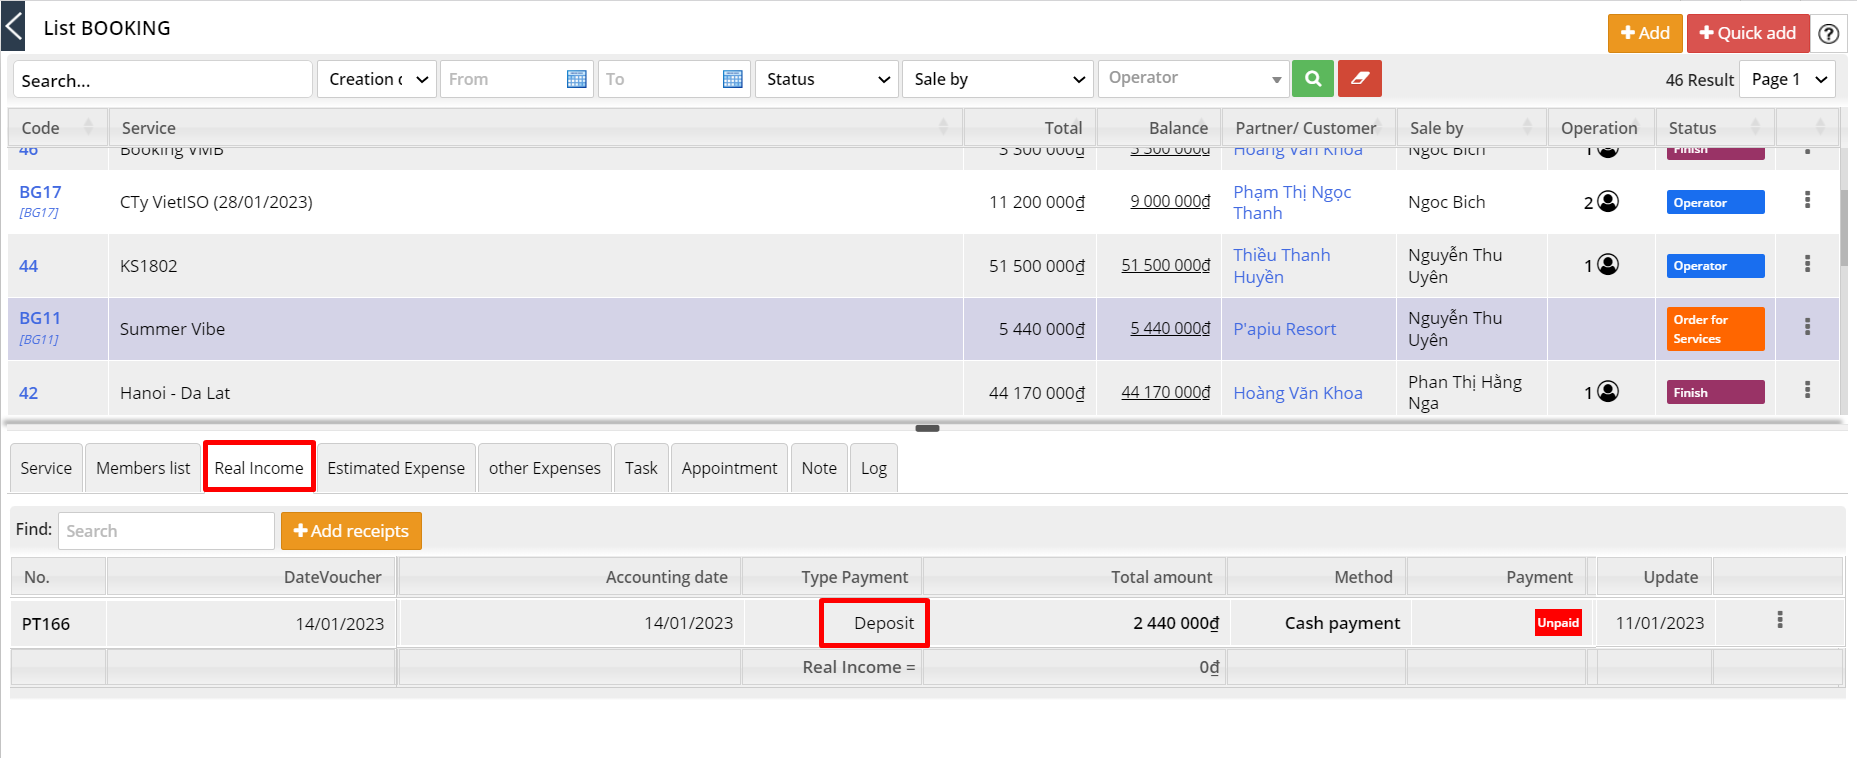
Method 2: Operations on Receipts in the Accounting department
Create 01 receipt, collect for booking with the amount you want to advance.
B. PAYMENT VOUCHER
Menu > Report > Payment Voucher
Receipt is a cash receipt when an accounting transaction related to cash arises. Receipt is also an invoice template that shows a completed transaction for that amount, which is an indispensable form in accounting forms.
Payment slips are made to record the actual amount of cash, foreign currency, etc., used as a basis for the cashier to release the fund, to record the cash book, and to record relevant expenses.
Note when processing on the Payment:

Image: Payment Voucher
Pay for: Booking (for external service booking) or Tour (for tour service booking). Enter the tour code/booking code according to the selected category
Booking Name
Receiver: Enter the payee's name
Invoiced by
Address
Pay for: Customers / Partners / Suppliers
Payment type: Deposit / Payment / Refund / Other Revenue
Payment: Payment method (Cash/Bank Transfer)
Reason: Payment Contents
Payment date, Accounting date
No: The voucher number will default to the system code. However, the Accountant may change to conform to the Enterprise's Convention regarding the number of vouchers.
Reference Service: When creating a new payment slip, you will not be able to click Reference because the system is defaulting when adding a new payment slip, it means that you are manipulating other expenses, that is, spending outside of the services included in the tour.
Currency: Payment currency. If the Currency is the same as the system Default Currency, the Rate is equal to 1. If the Currency is not the same as the System Default Currency, click
to edit or click for the system to automatically update the exchange rate.Accounting Content: Include content, Debit account, Credit account, amount.
Note: For sale, operator, accountant can note information related to customers and tour use: Account information, customer information and other information
Note:
+ ![]() and
and ![]() are the function save the Payment and does not affect the payment status of the voucher.
are the function save the Payment and does not affect the payment status of the voucher.
+ To pay the Payment Voucher, click ![]() the payment voucher will automatically switch to the Paid status and display a printout of the check.
the payment voucher will automatically switch to the Paid status and display a printout of the check.
Functions:
1. Add new Payment:
In the upper right corner of the list of Payments, click ![]() To add a new Payment, fill in the information according to the instructions above.
To add a new Payment, fill in the information according to the instructions above.
2. View Payment:
There are 2 ways to view Payments:
- Click ![]() at the end of each Voucher
at the end of each Voucher
- Right-click on the Payment you want to manipulate and click View
3. Edit Payment:
Right-click the Payment > select Edit. Click ![]() to save the edited content. Click
to save the edited content. Click ![]() to print the Payment. Click
to print the Payment. Click ![]() to confirm the payment, then automatically pop up 01 receipt to print the voucher.
to confirm the payment, then automatically pop up 01 receipt to print the voucher.
4. Print Payment:
To print a Payment, right-click on the Payment and click Print
5. Filter/Search Payment:
In the list of Payments, you can search for different Payments by criteria
- Code tour, booking: Enter the code then click
- Time Period: Enter the time period then click , system will display Payments suitable the system will display the Payments with the Accounting Date that meets the filter interval
- Payment: Choose Payment type then click
- Status: Choose Status of Payment then click
- Customer Name: Click on the Customer name, the system will display the Payments generated from the selected Customer
Click ![]() to clear filter conditions, the system will display all Payments in the software.
to clear filter conditions, the system will display all Payments in the software.
Note:
- To ensure that the payment/receipt slips after payment are not deleted, affecting the information data in the slips. After the receipt/receipt is ticked "Paid"/"Received", it cannot be deleted.
Update: 01/2023
Usage & Procedure
Marketing | Production | Booking service | Operation | Accounting | Finalization | System